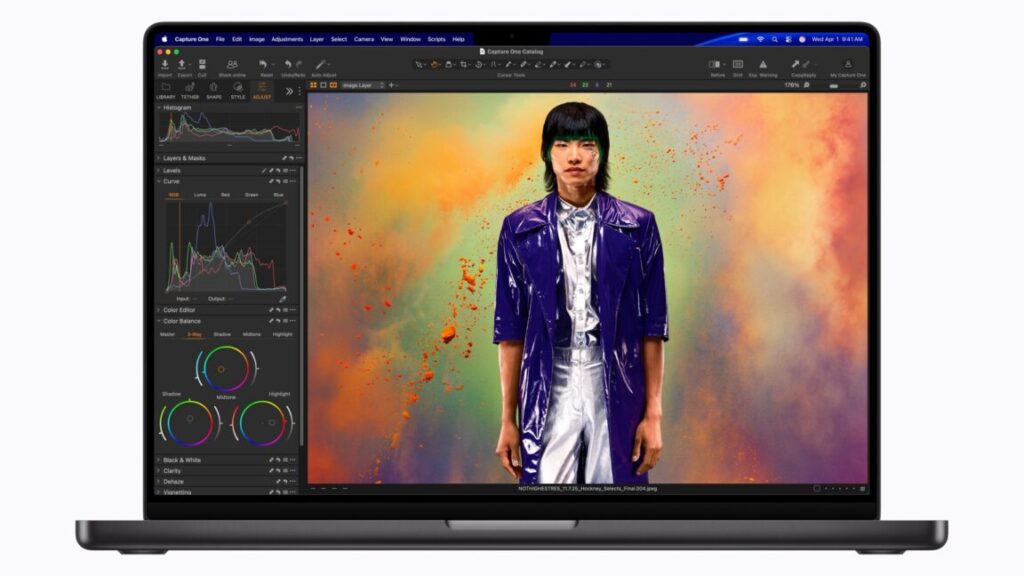
Apple updated its low-end MacBook Pro with the Apple M5 chip back in October, but the higher-end 14-inch and 16-inch Pros stuck with the M4 Pro and M4 Max chips. This morning, Apple circled back and updated the rest of the lineup, adding the M5 Pro and M5 Max to the higher-end machines and bumping the base storage—the M5 Pro now comes with 1TB of storage by default, while M5 Max chips come with 2TB of storage by default. The internal storage is said to be “up to 2x faster” than the previous-generation Pros. Apple is also bumping the base storage for the M5 MacBook Pro from 512GB to 1TB.
Unlike Apple’s other announcements this week, though, these upgrades also come with increases to their starting prices; the 14-inch MacBook Pro with an M5 Pro chip now starts at $2,199 instead of $1,999, and the 16-inch model with an M5 Pro chip starts at $2,699 instead of $2,499. The M5 MacBook Pro now starts at $1,699, up from $1,599. Granted, you’re getting double the storage of those old base models, but you no longer have the option to pay less if you don’t need 1TB of space.
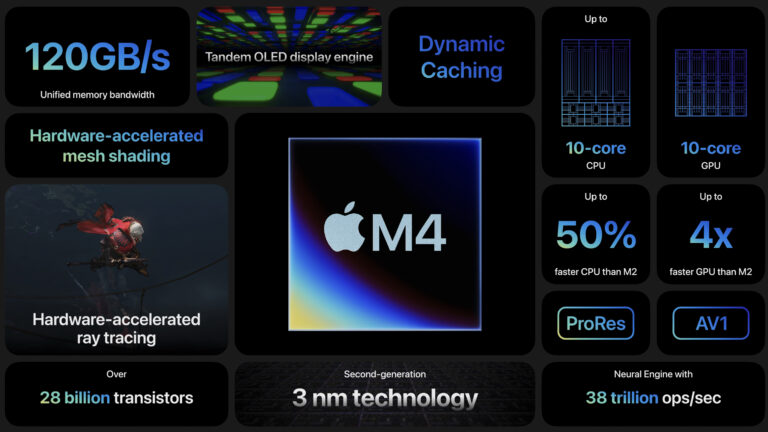
The M5 Pro and M5 Max look like fairly major updates from the M4 Pro and M4 Max. Both use an 18-core CPU with six higher-performing cores and 12 lower-performing cores, but Apple is changing how it talks about each kind of core. The high-performance cores are now called “super cores,” a change that Apple says will retroactively apply to the high-performance cores in the basic Apple M5. The M5 has four of them, and M5 Pro and M5 Max have six.
Apple says the 12 other CPU cores in the M5 Pro and M5 Max are an “all-new performance core that is optimized to deliver greater power-efficient, multithreaded performance for pro workloads.” These appear to be different from the efficiency cores used in M5 and older Apple chips. Apple didn’t make direct generation-over-generation performance comparisons, but it did say that M5 Pro and M5 Max “deliver up to 2.5x higher multithreaded performance than M1 Pro and M1 Max.”
Most new Macs can still be downgraded with few downsides. Here’s what to know.
An Ars Technica colleague recently bought a new M4 MacBook Air. I have essentially nothing bad to say about this hardware, except to point out that even in our current memory shortage apocalypse, Apple is still charging higher-than-market-rates for RAM and SSD upgrades. Still, most people buying this laptop will have a perfectly nice time with it.
But for this colleague, it was also their first interaction with macOS 26 Tahoe and the Liquid Glass redesign, the Mac’s first major software design update since the Apple Silicon era began with macOS 11 Big Sur in 2020.
Negative consumer reaction to Liquid Glass has been overstated by some members of the Apple enthusiast media ecosystem, and Apple’s data shows that iOS 26 adoption rates are roughly in line with those of the last few years. But the Mac’s foray into Liquid Glass has drawn particular ire from longtime users (developers Jeff Johnson and Norbert Heger have been tracking persistently weird Finder and window resizing behavior, to pick two concrete examples, and Daring Fireball’s John Gruber has encouraged users not to upgrade).
My general approach to software redesigns is to just roll with them and let their imperfections and quirks become background noise over time—it’s part of my job to point out problems where I see them, but I also need to keep up with new releases whether I’m in love with them or not.
But this person has no such job requirement, and they had two questions: Can I downgrade this? And if so, how?
The answer to the first question is “yes, usually,” and Apple provides some advice scattered across multiple documentation pages. This is an attempt to bring all of those steps together into one page, aimed directly at new Mac buyers who are desperate to switch from Tahoe to the more-familiar macOS 15 Sequoia.
Table of Contents
A preemptive warning about security updates and older versions of macOS
Before we begin: Apple handles macOS updates differently from iOS updates. Eventually, Apple requires devices that support the latest iOS and iPadOS versions to install those updates if they want to continue getting security patches. That means if your iPhone or iPad can run iOS or iPadOS 26, it needs to be running iOS or iPadOS 26 to stay patched.
Older macOS versions, on the other hand, are updated for around three years after they’re initially released. The first year, they get both security patches and new features. The next two years, they get security patches and new versions of the Safari browser. Macs running older-but-supported macOS versions also generally continue to get the same firmware updates as those running the latest macOS version.
Generally, we’d recommend against using macOS versions after security updates have dried up. For macOS 15 Sequoia, that will happen around September or October of 2027. Apple also sometimes leaves individual vulnerabilities unpatched on older operating systems; only the latest releases are guaranteed to get every patch. If you can look past the elements of Tahoe’s design that bother you most, staying on it is the safest option.
You can follow steps similar to the ones in this guide to downgrade some Macs to even older versions of macOS, but I wouldn’t recommend it; macOS 14 Sonoma will get security and Safari updates for only another six months or so, which isn’t long enough to justify spending the time to install it.
What we won’t cover is how to transfer data you want to keep from your Tahoe install to an older version of macOS. We’re assuming you have a new and relatively pristine Mac to downgrade, one that you haven’t loaded up with data other than what you already have synced to iCloud.
Can my Mac downgrade?
Mostly, yes. Any Mac with an M4 family chip or older, including the M4 MacBook Air and everything else in Apple’s current lineup, should support the current version of Sequoia (as of this writing, 15.7.4, with Safari 26.3).
As a rule of thumb, Macs will not run any version of macOS older than the one they shipped with when they launched. Apple provides security updates for older versions of macOS, but it doesn’t bother backporting drivers and other hardware support from newer versions to older ones.
The only Mac to launch since Tahoe was released is the M5 MacBook Pro, so owners of that system will need Tahoe or newer. If Apple puts out new Macs in early March as expected, those Macs will also only work with Tahoe or newer, and downgrades won’t be possible.
Although we’re mainly talking about new Macs here, these steps should all be identical for any Apple Silicon Mac, from the original M1 computers on up. If you buy a recently used Mac that ships with Tahoe installed, a downgrade still works the same way. We won’t cover the steps for installing anything on an Intel Mac—vanishingly few of them support Tahoe in the first place, and most people certainly shouldn’t be buying them at this late date.
Option one: A bootable USB installer
Apple hasn’t shipped physical install media for macOS in 15 years, but each downloadable installer still includes the bits you need to make a bootable USB install drive. And while late-Intel-era Macs with Apple T2 chips briefly made booting from external media kind of a pain, Apple Silicon Macs will boot from a USB drive just as easily and happily as early Intel-era Macs did.
This method will be the easiest for most people because it only requires you to own a single Mac—the one you’re downgrading.
Create the USB installer
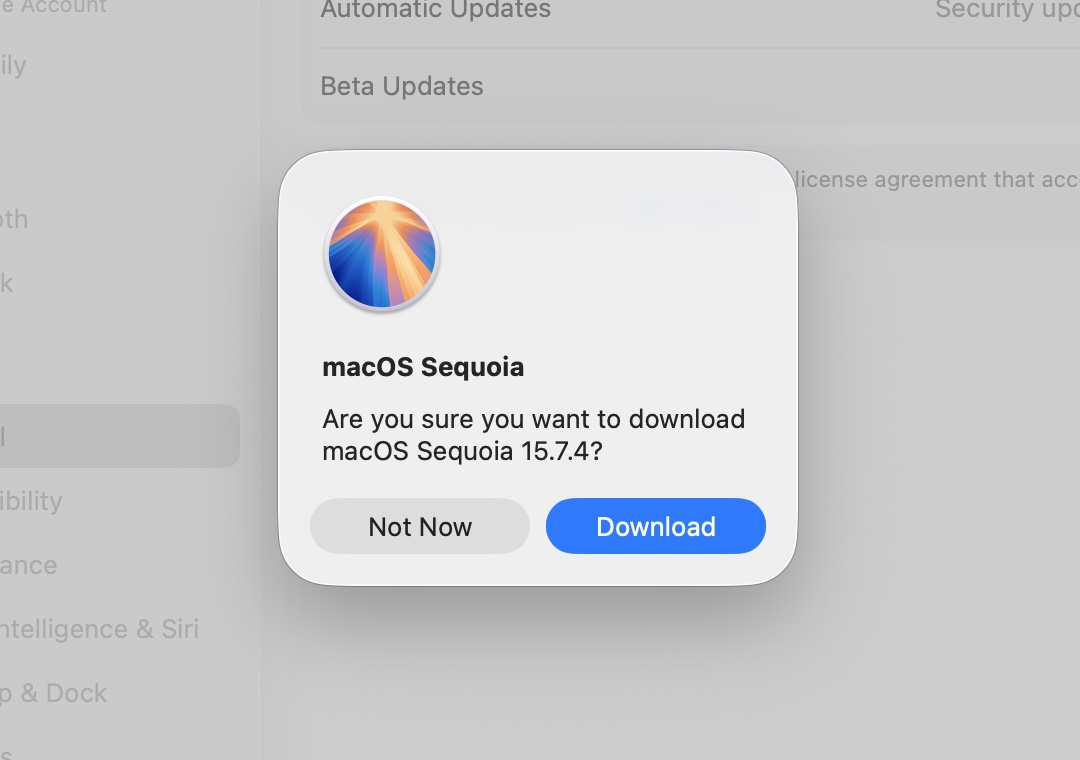
Downloading the Sequoia installer through Software Update. Downloading this way serves as an additional compatibility check; your Mac won’t download any version of macOS too old for it to run.
Credit: Andrew Cunningham
Downloading the Sequoia installer through Software Update. Downloading this way serves as an additional compatibility check; your Mac won’t download any version of macOS too old for it to run. Credit: Andrew Cunningham
To make a USB installer, you’ll need a 32GB or larger USB flash drive and the downloadable macOS Sequoia installer. A 16GB drive was large enough for macOS for many years, but Sequoia and Tahoe are too large by a couple of gigabytes.
Apple’s support page here links to every downloadable macOS installer going back to 2011’s 10.7 Lion. In Tahoe, the macOS Sequoia link takes you to the App Store, which then bounces you to Software Update in the Settings app. This process has enough points of failure that it may not work the first time; try clicking the “Get” button in the App Store again and it usually goes.
If you’re downloading the installer from within macOS Tahoe, you’ll see a pop-up when the download completes, telling you that the installer can’t be run from within that version of macOS. Since we’ll be running it off of its own USB stick, you can safely ignore this message.
While the installer is downloading, install and prepare your USB drive. Open Disk Utility, click the View button, and select “show all devices.” Click the root of your USB drive under the “external” header in the left sidebar, and click the Erase button in the upper-right control area.
Change the disk’s name to whatever you want—I use “MyVolume” so I don’t have to change Apple’s sample terminal commands when copying the installer files—and make sure the Format is set to Mac OS Extended (Journaled) and the Scheme is set to GUID Partition Map. (That’s not an error; the macOS installer still wants an HFS+ filesystem rather than APFS.)
The handy thing is that if you have a larger USB drive, you can create installers for multiple macOS versions by partitioning the disk with the Partition button. A 64GB drive split into three ~21GB partitions could boot Tahoe, Sequoia, and another past or future macOS version; I just have it split into two volumes so I can boot Sequoia and Tahoe installers from the same drive.
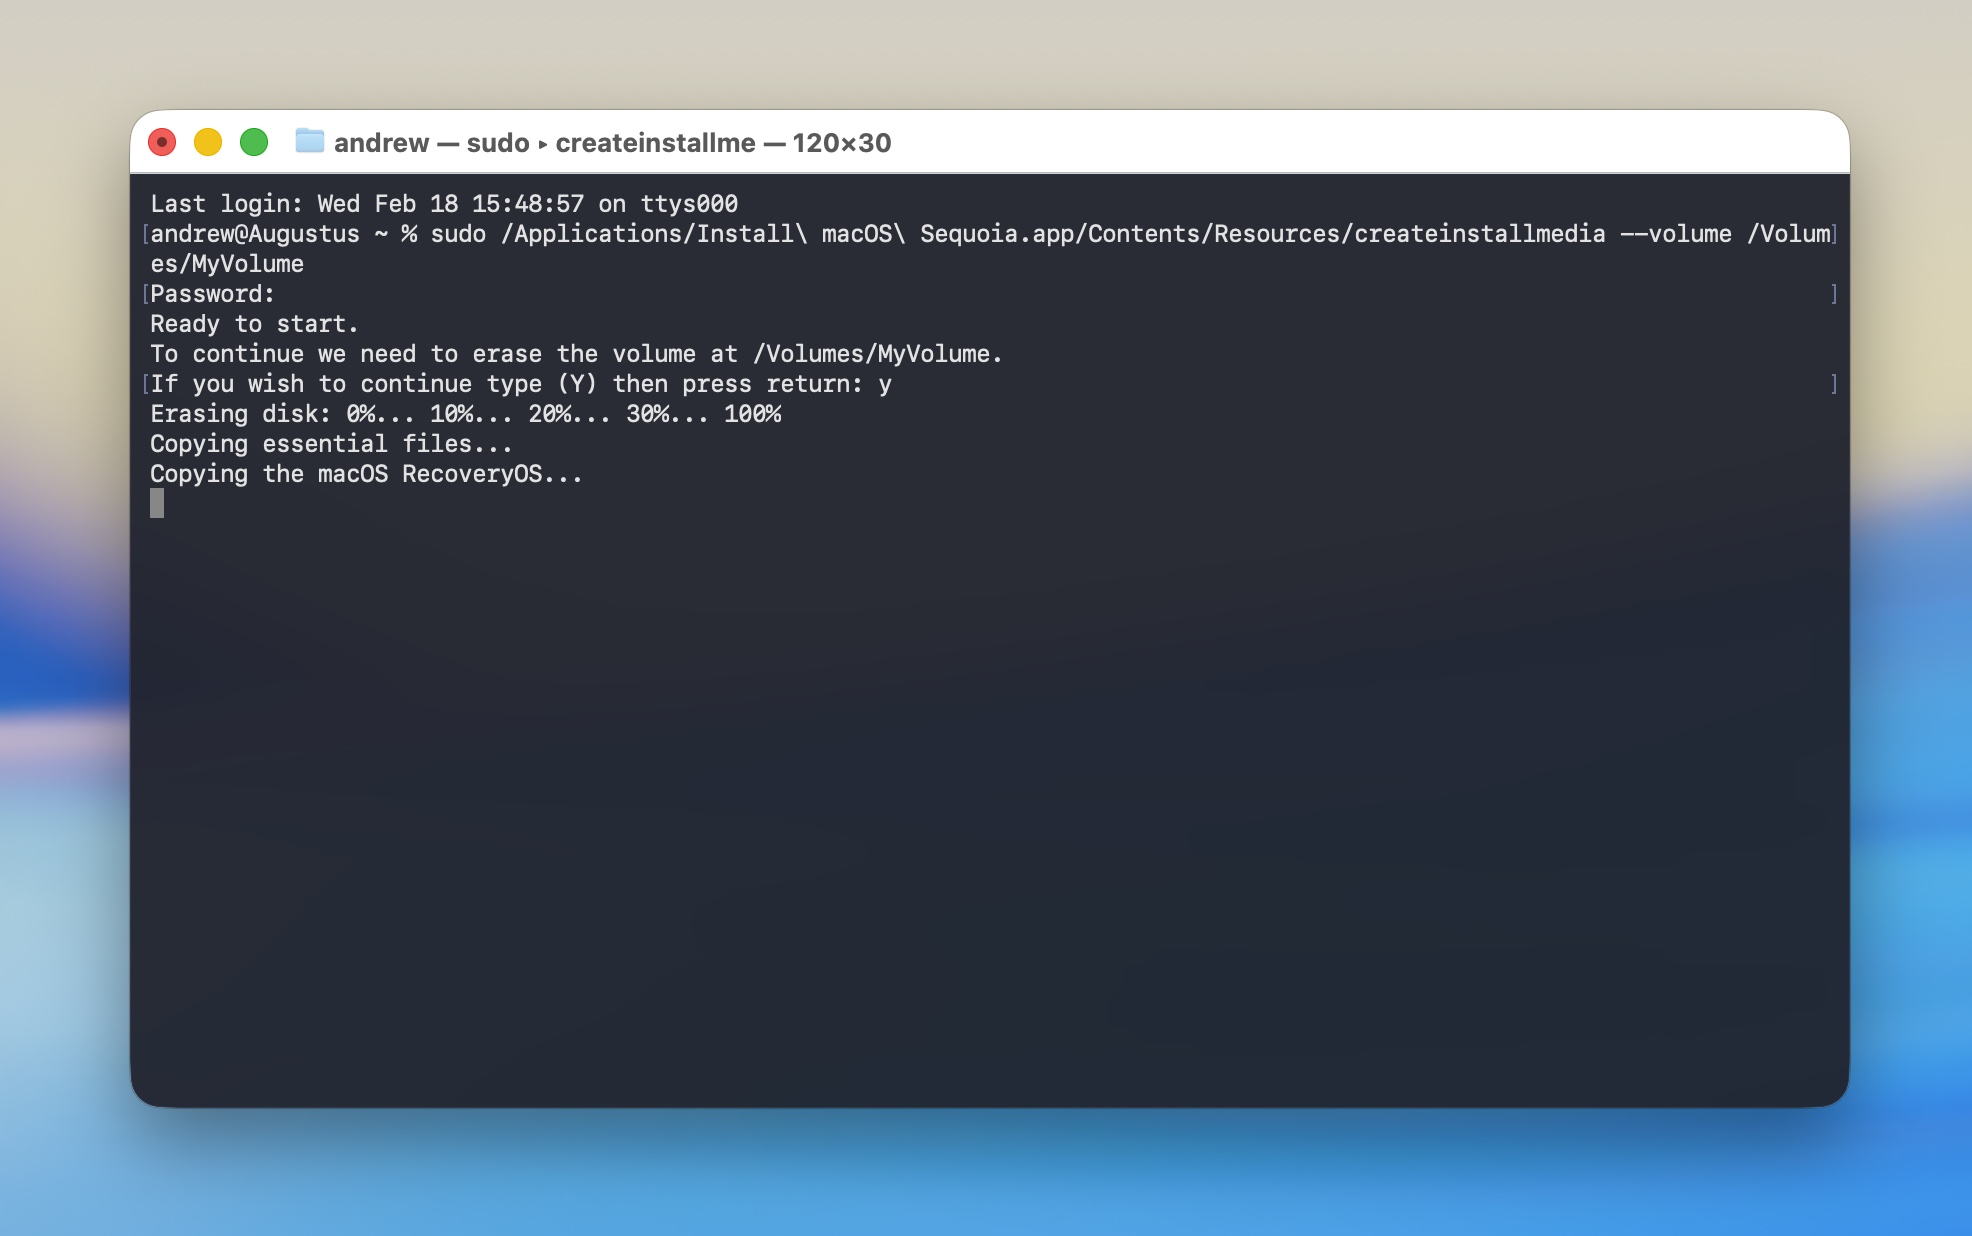
Running the Terminal command to create our macOS 15 Sequoia boot drive.
Credit: Andrew Cunningham
Running the Terminal command to create our macOS 15 Sequoia boot drive. Credit: Andrew Cunningham
Once the Sequoia installer is in your Applications folder, run a Terminal command to copy the installer files. Apple has commands for each version of macOS on this page. Use this one for Sequoia:
If you named the USB drive something other than MyVolume when you formatted it, change the name in the command as well. Note that names with spaces require a backslash before each space.
The Terminal will prompt you for your password and ask you to type Y to confirm. It will then reformat the drive and copy the files over. The time this takes will vary depending on the speed of the USB drive you’re using, but for most USB 3 drives, it should only take a few minutes to create the installer. When the Terminal command is done running, leave the disk inserted and shut down your Mac.
Using the USB installer
With your Mac powered down and the USB installer drive inserted, press and hold the power button on your Mac (the Touch ID button on any laptop or the dedicated power button on a desktop) until the text under the Apple logo changes to “loading startup options.” You should see the macOS Sequoia installer listed alongside Macintosh HD as a boot option; highlight it and click Continue. If you don’t see the Sequoia installer, you may need an extra step—highlight Options, then click Continue, and we’ll talk more about this momentarily.
Once booted, the Sequoia installer will automatically launch the macOS installer to do an in-place upgrade, which isn’t what we want. Hit Command+Q to quit the installer and click through the confirmation, and you’ll get the typical menu of recovery environment options; from here, launch Disk Utility, click the top level of the internal Macintosh HD disk, and click Erase. Click through the prompts to erase the Mac and restart.
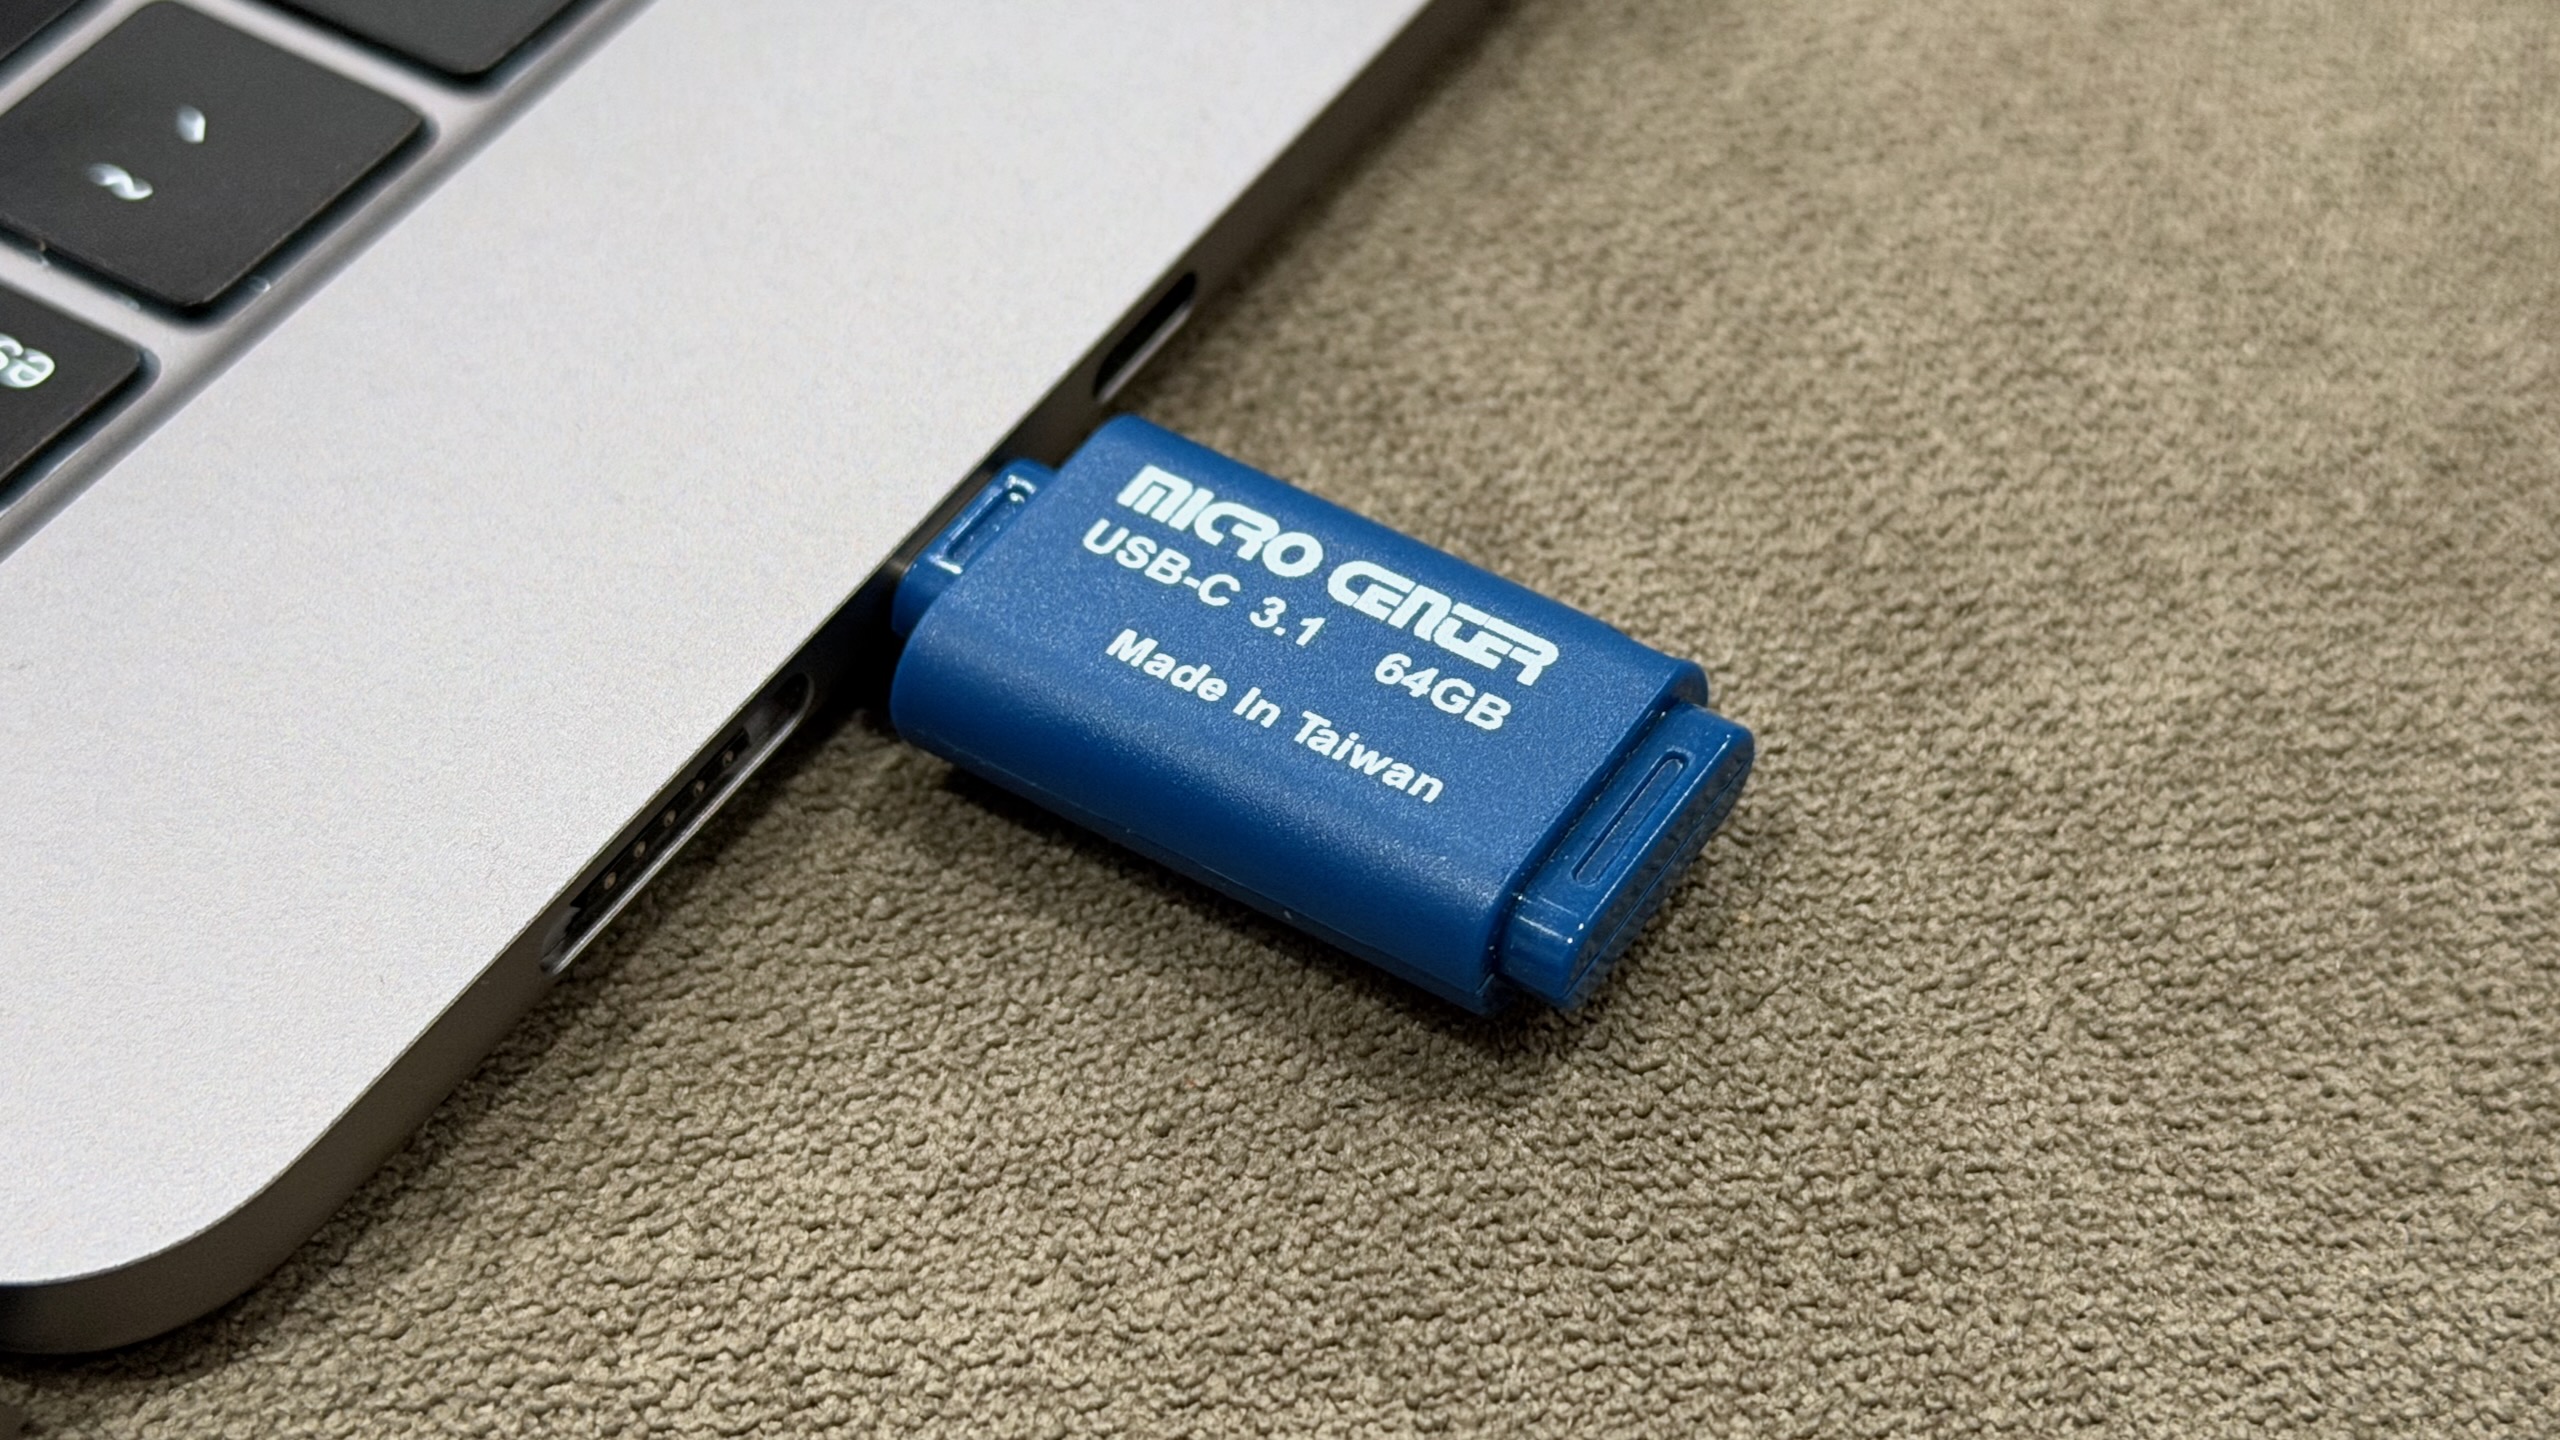
My own macOS USB installer from my beloved Micro Center.
Credit: Andrew Cunningham
My own macOS USB installer from my beloved Micro Center. Credit: Andrew Cunningham
After the Mac restarts, you’ll need an Internet connection to activate it before you can do anything else with it; connect using the Wi-Fi menu in the top-right, typing in your network SSID and password manually if the menu doesn’t auto-populate. This will activate your Mac and get you back to the recovery environment menu.
Here, select the Sequoia installer and click through the prompts—you should be able to install Sequoia on the now-empty Macintosh HD volume with no difficulty. From here, there’s nothing else to do. Wait until the installation completes, and when it’s ready, it will boot into a fresh Sequoia install, ready to be set up.
If you didn’t see your Sequoia installer in the boot menu before and you clicked the Options gear instead, it usually means that FileVault encryption or Find My was enabled on the Mac—maybe you signed into your Apple account when you were initially setting up Tahoe before you decided you wanted nothing to do with it.
When you boot into the recovery environment, you’ll be asked to select a user you know the password for, which will unlock the encrypted disk. If all you want to do is erase the Mac and make it bootable from your USB stick, don’t worry about this; just select Recovery Assistant from the menu, select Erase Mac, and click through the prompts. Then, use the steps above to boot from your USB stick, and you should be able to install a fresh copy of whatever macOS version you want to the now-erased internal drive.
The nuclear option: A DFU restore
Normally, a bootable USB installer does everything you need it to do. It wipes the data from your Mac’s internal storage and replaces it with new data. But occasionally you need to drill a little deeper, either because your Mac becomes unresponsive or you’ve been running beta software and want to switch back to a stable release. Or just because other steps haven’t worked for you.
The nuclear option for resetting a Mac is a DFU (or Device Firmware Upgrade) restore. Based on the restore process for iPhones and iPads, a DFU restore uses a compressed IPSW archive that contains not only the macOS system files but also firmware files for all Apple Silicon Macs. The USB installer just replaces macOS; the DFU restore replaces everything from the firmware on up. (These are also the same files used to create macOS virtual machines using Apple’s Virtualization Framework.)
Because a DFU restore can only be performed on a Mac that’s booted into a special DFU mode, you’ll need a second Mac with a USB-C or Thunderbolt port, plus a USB-C cable. Apple says the USB-C charging cable included with Macs will work for this but not to use a Thunderbolt cable; I’ve used a generic USB-C cable, and it has worked fine.
The first step is to download the relevant IPSW file from Apple. This page on the Mr. Macintosh site is the one I have bookmarked because it’s a good repository of virtually every macOS IPSW file Apple has ever released, including beta versions for when those are useful.
First, download the macOS 15.6.1 IPSW file linked on that page (and here) to your host Mac (Apple stops releasing IPSW files for older OSes once newer ones have been released, so this is the newest file you’ll be able to get for macOS 15). Both iPhones and iPads have model-specific IPSW files, but for macOS, there’s just one image that works with all Macs.
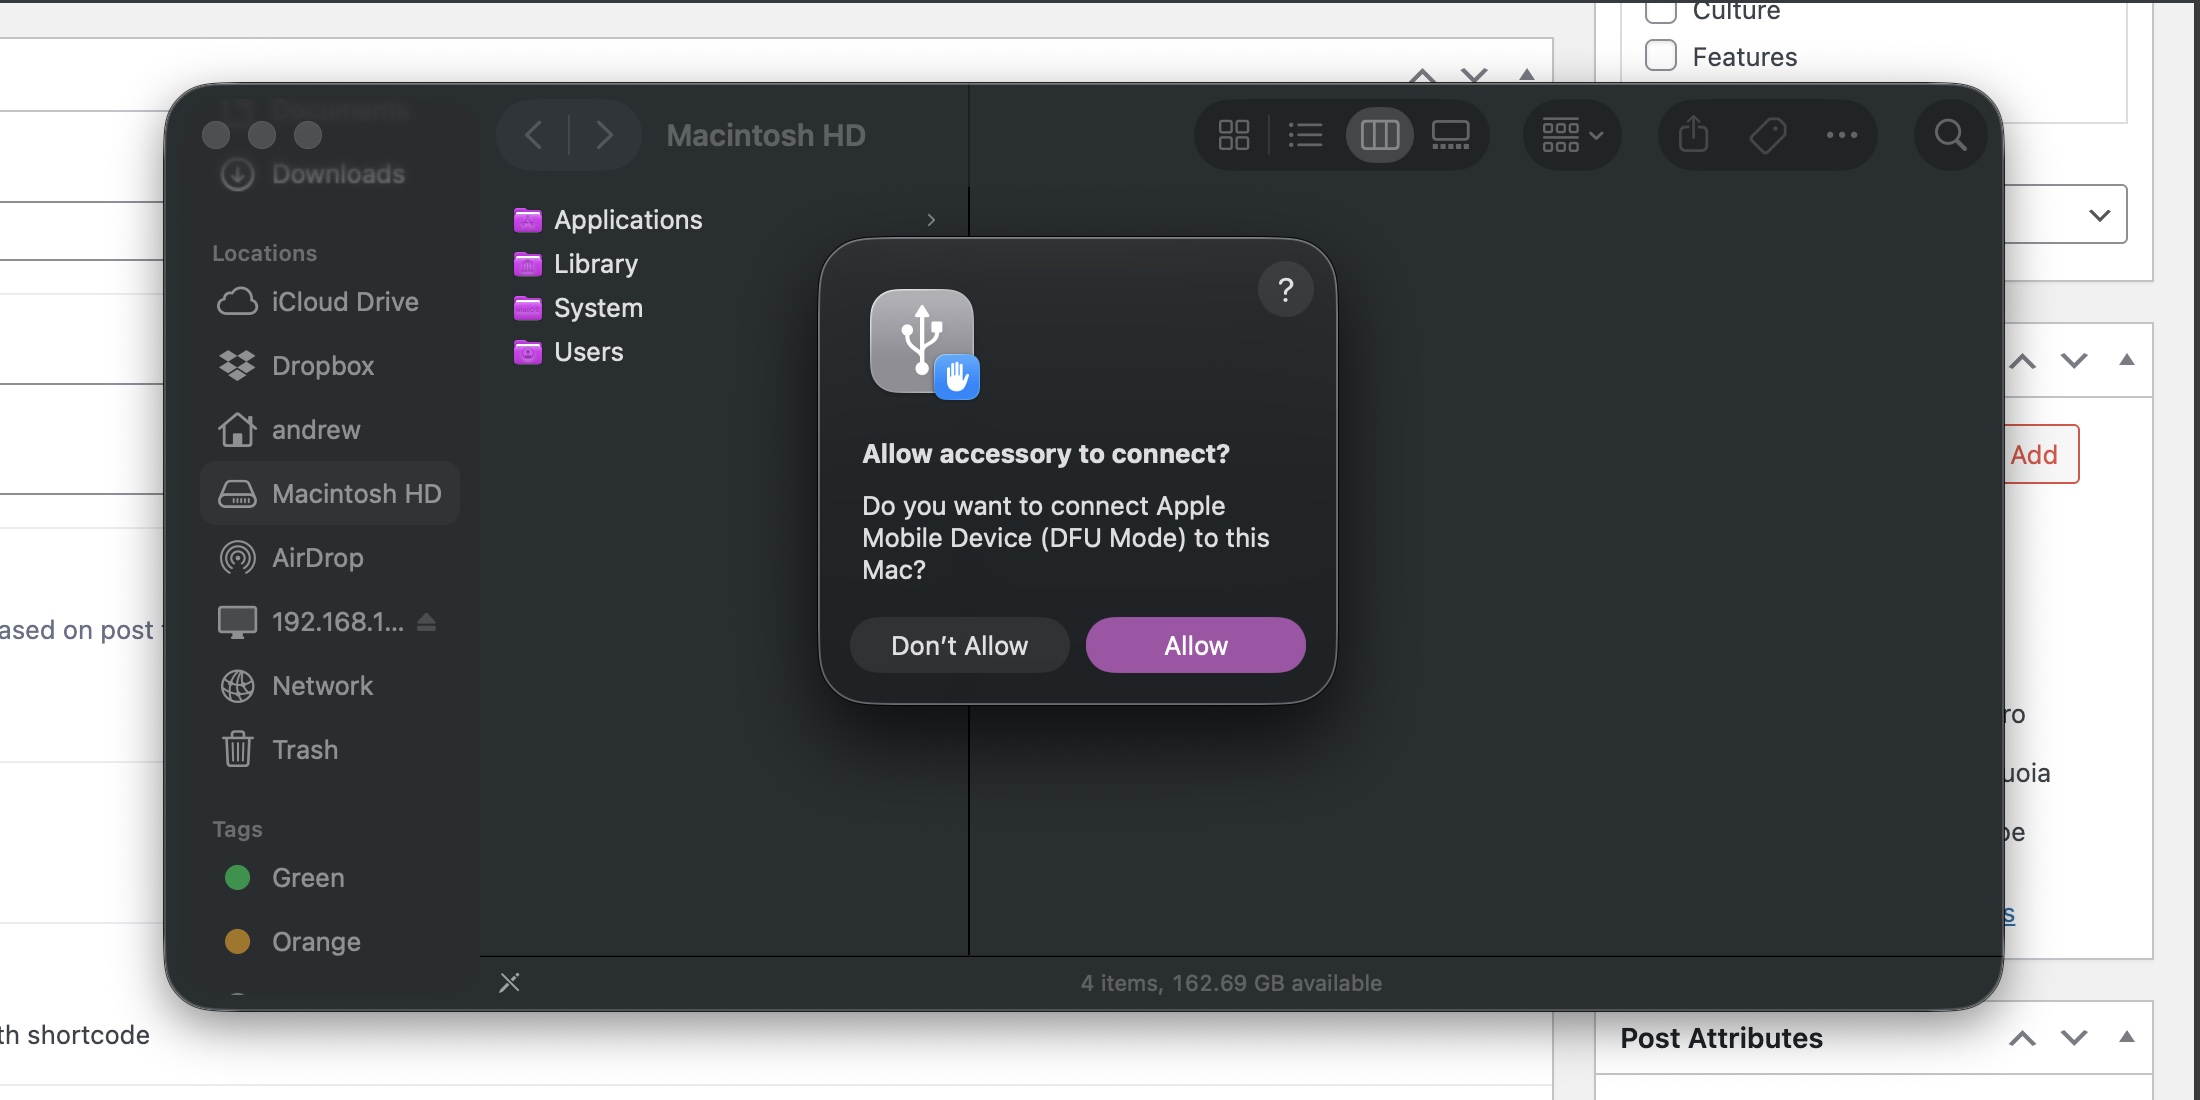
On the Mac you’re trying to restore—we’ll call it the “target Mac” for simplicity’s sake—figure out which of its USB-C ports is the designated DFU port. There’s only one that will work, and it’s usually the leftmost or rightmost port. Plug one end of the USB-C cable into that DFU port and the other into any USB-C port on your host Mac and follow Apple’s instructions for how to boot the system into DFU mode.
A Mac in DFU mode will need permission before your Mac can work with it.
Credit: Andrew Cunningham
A Mac in DFU mode will need permission before your Mac can work with it. Credit: Andrew Cunningham
When it’s successfully booted into DFU mode, your host Mac will see the target Mac, and you’ll see the same notification you get any time you plug in USB accessories for the first time. Allow it to connect, open a Finder window, and scroll down the left-hand sidebar until you get to “Mac” under the Locations heading.
The Finder’s DFU interface is pretty simple—a picture, a line of text, and two buttons. We want to restore, not revive, the Mac. Clicking the Revive Mac button will normally download and install the latest macOS version from Apple. But you can force it to use a different IPSW file—like the Sequoia one we just downloaded—by holding down the Option key as you click it. Navigate to the IPSW file, open it, and allow the restore process to begin.
This will take some time; you can track progress in the first phase in the Finder window. After a few minutes, the Mac you’re restoring will light back up, and you can watch its progress there. Once the target Mac reboots with its signature chime, the process is complete.
Because the IPSW file is for an outdated version of Sequoia, the first thing you’ll want to do is hit Software Update for the latest Sequoia and Safari versions; you’ll be offered a Tahoe upgrade, but you obviously won’t want to do that after the trouble you just went through. Scroll down to “other updates,” and you’ll be offered all the non-Tahoe updates available.
Downgrader’s remorse?
You will run into a handful of downsides when running an older version of macOS, especially if you’re trying to use it with iPhones and/or iPads that have been updated to version 26.
Most of the awkwardness will involve new features introduced in Messages, Notes, Reminders, and other Apple apps that sync between devices. The Messages app in Sequoia doesn’t support background images or polls, and it handles spam filtering slightly differently. They’re minor absences and annoyances, mostly, but they’re still absences and annoyances.
At least for the time being, though, you’ll find Sequoia pretty well-supported by most of Apple’s ecosystem. Core services like iCloud and iMessage aren’t going anywhere; Xcode still supports Sequoia, as does every Apple Creator Studio app update aside from the new Pixelmator Pro. App support may eventually drop off, but there’s not a lot that requires the latest and greatest version of macOS.
If and when you decide it’s time to step up to a newer version of macOS, Tahoe (or whatever macOS 27 is called) will be there in Software Update waiting for you. You’ll need to install a new version eventually if you want to keep getting app updates and security patches. But you don’t have to yet.
Andrew is a Senior Technology Reporter at Ars Technica, with a focus on consumer tech including computer hardware and in-depth reviews of operating systems like Windows and macOS. Andrew lives in Philadelphia and co-hosts a weekly book podcast called Overdue.
Apple’s 2026 has already brought us the AirTag 2 and a new Creator Studio app subscription aimed at independent content creators, but nothing so far for the company’s main product families.
That could change soon, according to reporting from Bloomberg’s Mark Gurman. New versions of Apple’s low-end iPhone, the basic iPad and iPad Air, and the higher-end MacBook Pros are said to be coming “imminently,” “soon,” and “shortly,” respectively, ahead of planned updates later in the year for the iPad mini, Studio Display, and other Mac models.
Here’s what we think we know about the hardware that’s coming.
iPhone 17e
Apple is apparently planning to launch an updated iPhone 17e, a new version of its basic iPhone. The phone is said to include an A19 chip similar to the one in the regular iPhone 17, and it will also add MagSafe charging. Though the iPhone 17e will likely stick to the basic one-lens camera system and the notched, Dynamic Island-less screen, it will also launch at the same $599 price as the current 16e, which counts as good news given current AI-driven RAM and storage shortages.
This would be a change in how Apple approaches its lower-end iPhone. The old iPhone SE was updated pretty sporadically, with at least a couple of years between each of its updates. The iPhone 16e was introduced just last year.
The biggest question is whether the 17e will continue to exist alongside the older but arguably superior iPhone 16 and 16 Plus, which start at just $100 more than the current iPhone 16e and include a dual-lens camera system and the Dynamic Island. Having four different iPhone models available in the same $600-to-$800 price range is confusing at best.
Mac power users waiting on new high-end MacBook Pro models may have been disappointed last fall, when Apple released an M5 upgrade for the low-end 14-inch MacBook Pro without touching the M4 Pro or Max versions of the laptop. But the wait for M5 Pro and M5 Max models may be nearing its end.
The tea-leaf readers at MacRumors noticed that shipping times for a handful of high-end MacBook Pro configurations have slipped into mid-to-late February, rather than being available immediately as most Mac models are. This is often, though not always, a sign that Apple has slowed down or stopped production of an existing product in anticipation of an update.
Currently, the shipping delays affect the M4 Max versions of both the 14-inch and 16-inch MacBook Pros. If you order them today, these models will arrive sometime between February 3 and February 24, depending on the configuration you choose; many M4 Pro versions are still available for same-day shipping, though adding a nano-texture display or upgrading RAM can still add a week or so to the shipping time.
Apple could choose to launch new Pro hardware on January 28, to go with the new Creator Studio subscription it announced last week. Aimed primarily at independent content creators that make their own video, audio, and images, the Creator Studio subscription bundles Final Cut Pro, Logic Pro, Pixelmator Pro, and enhancements for the Pages, Numbers, and Keynote apps (along with some other odds and ends) for $13 a month or $130 a year. None of these apps require a MacBook Pro, but many would benefit in some way from the additional CPU and GPU power, RAM, and storage available in Apple’s high-end laptops.
Of course, an imminent replacement isn’t the only reason why the shipping estimates for any given Mac might slip. Ongoing, AI-fueled RAM shortages could be causing problems, and Apple probably prioritizes production of the widely-used base-model M4 and M5 chips to the larger, more expensive, more complex Max models.
But the only other device in Apple’s lineup that offers the M4 Max and similar RAM configuration options is the high-end Mac Studio, which currently isn’t subject to the same shipping delays. That does imply that the delays are specific to the MacBook Pro—and one explanation for this is that the laptop is about to be replaced.
At multiple points over many years, Apple executives have taken great pains to point out that they think touchscreen Macs are a silly idea. But it remains one of those persistent Mac rumors that crops up over and over again every couple of years, from sources that are reliable enough that they shouldn’t be dismissed out of hand.
Today’s contribution comes from supply chain analyst Ming Chi-Kuo, who usually has some insight into what Apple is testing and manufacturing. Kuo says that touchscreen MacBook Pros are “expected to enter mass production by late 2026,” and that the devices will also shift to using OLED display panels instead of the Mini LED panels on current-generation MacBook Pros.
Kuo says that Apple’s interest in touchscreen Macs comes from “long-term observation of iPad user behavior.” Apple’s tablet hardware launches in the last few years have also included keyboard and touchpad accessories, and this year’s iPadOS 26 update in particular has helped to blur the line between the touch-first iPad and the keyboard-and-pointer-first Mac. In other words, Apple has already acknowledged that both kinds of input can be useful when combined in the same device; taking that same jump on the Mac feels like a natural continuation of work Apple is already doing.
Touchscreens became much more common on Windows PCs starting in 2012 when Windows 8 was released, itself a response to Apple’s introduction of the iPad a couple of years before. Microsoft backed off on almost all of Windows 8’s design decisions in the following years after the dramatic UI shift proved unpopular with traditional mouse-and-keyboard users, but touchscreen PCs like Microsoft’s Surface lineup have persisted even as the software has changed.
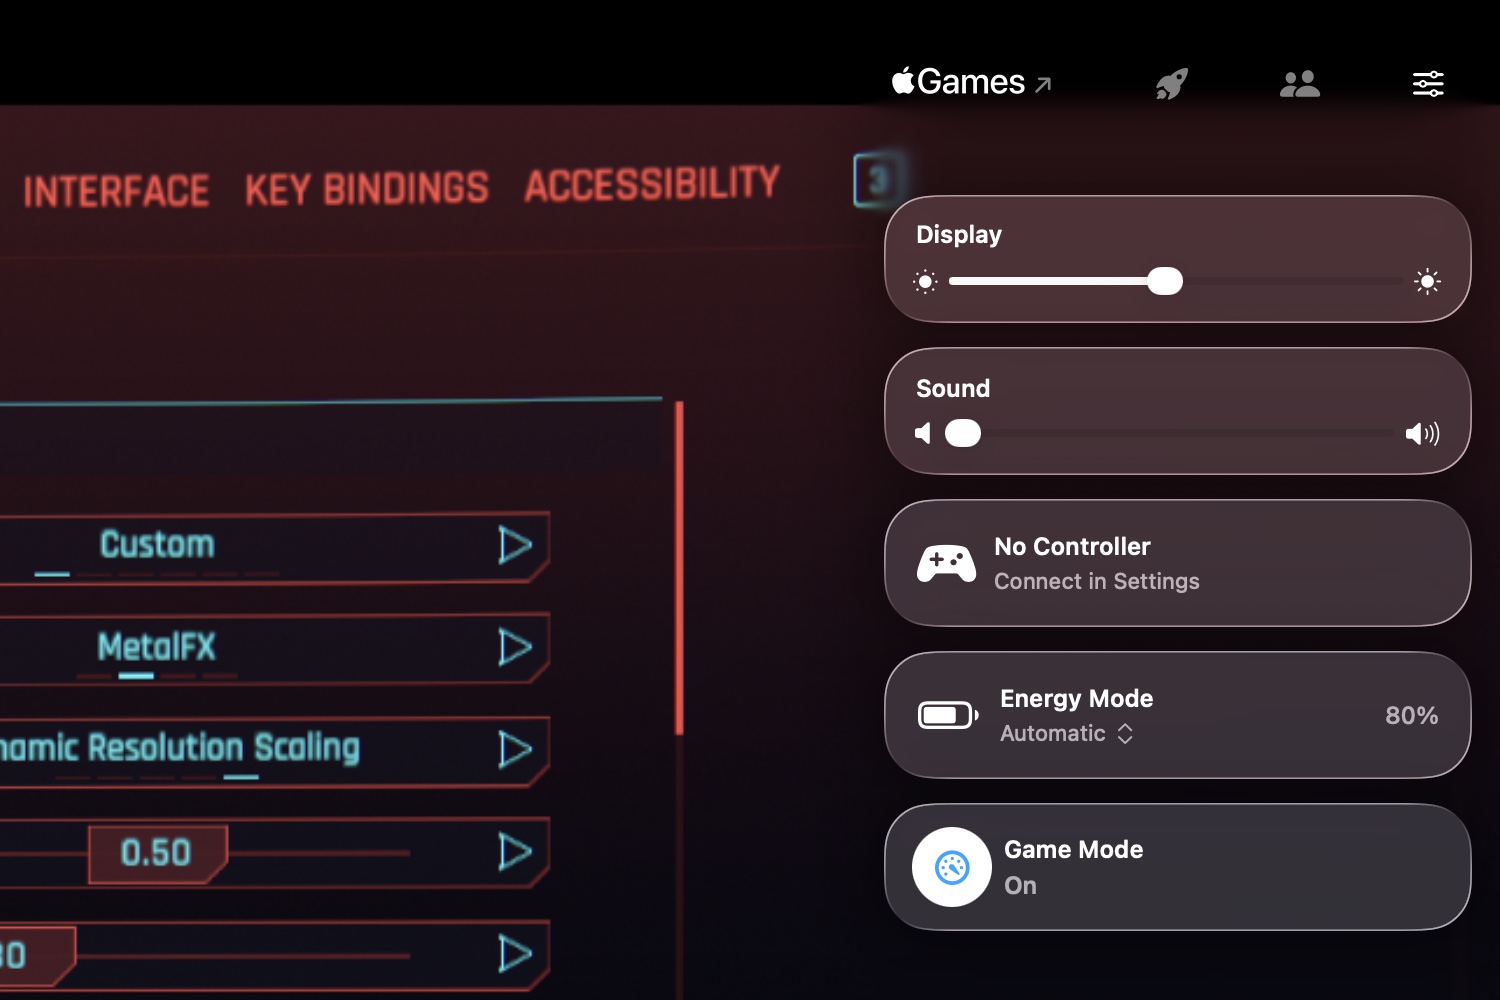
The Game Overlay in macOS Tahoe. Credit: Andrew Cunningham
Tahoe’s new Game Overlay doesn’t add features so much as it groups existing gaming-related features to make them more easily accessible.
The overlay makes itself available any time you start a game, either via a keyboard shortcut or by clicking the rocketship icon in the menu bar while a game is running. The default view includes brightness and volume settings, toggles for your Mac’s energy mode (for turning on high-performance or low-power mode, when they’re available), a toggle for Game Mode, and access to controller settings when you’ve got one connected.
The second tab in the overlay displays achievements, challenges, and leaderboards for the game you’re playing—though only if they offer Apple’s implementation of those features. Achievements for games installed from Steam, for example, aren’t visible. And the last tab is for social features, like seeing your friends list or controlling chat settings (again, when you’re using Apple’s implementation).
More granular notification summaries
I didn’t think the Apple Intelligence notification summaries were very useful when they launched in iOS 18 and macOS 15 Sequoia last year, and I don’t think iOS 26 or Tahoe really changes the quality of those summaries in any immediately appreciable way. But following a controversy earlier this year where the summaries botched major facts in breaking news stories, Apple turned notification summaries for news apps off entirely while it worked on fixes.
Those fixes, as we’ve detailed elsewhere, are more about warning users of potential inaccuracies than about preventing those inaccuracies in the first place.
Apple now provides three broad categories of notification summaries: those for news and entertainment apps, those for communication and social apps, and those for all other kinds of apps. Summaries for each category can be turned on or off independently, and the news and entertainment category has a big red disclaimer warning users to “verify information” in the individual news stories before jumping to conclusions. Summaries are italicized, get a special icon, and a “summarized by Apple Intelligence” badge, just to make super-ultra-sure that people are aware they’re not taking in raw data.
Personally, I think if Apple can’t fix the root of the problem in a situation like this, then it’s best to take the feature out of iOS and macOS entirely rather than risk giving even one person information that’s worse or less accurate than the information they already get by being a person on the Internet in 2025.
As we wrote a few months ago, asking a relatively small on-device language model to accurately summarize any stack of notifications covering a wide range of topics across a wide range of contexts is setting it up to fail. It does work OK when summarizing one or two notifications, or when summarizing straightforward texts or emails from a single person. But for anything else, be prepared for hit-or-miss accuracy and usefulness.
Relocated volume and brightness indicators
The pop-ups you see when adjusting the system volume or screen brightness have been redesigned and moved. The indicators used to appear as large rounded squares, centered on the lower half of your primary display. The design had changed over the years, but this was where they’ve appeared throughout the 25-year existence of Mac OS X.
Now, both indicators appear in the upper-right corner of the screen, glassy rectangles that pop out from items on the menu bar. They’ll usually appear next to the Control Center menu bar item, but the volume indicator will pop out of the Sound icon if it’s visible.
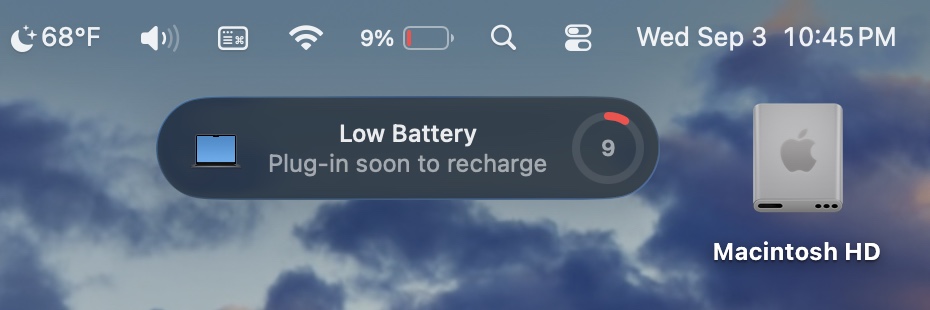
New low battery alert
Tahoe picks up an iPhone-ish low-battery alert on laptops. Credit: Andrew Cunningham
Tahoe tweaks the design of macOS’ low battery alert notification. A little circle-shaped meter (in the same style as battery meters in Apple’s Batteries widgets) shows you in bright red just how close your battery is to being drained.
This notification still shows up separately from others and can’t be dismissed, though it doesn’t need to be cleared and will go away on its own. It starts firing off when your laptop’s battery hits 10 percent and continues to go off when you drop another percentage point from there (it also notified me without the percentage readout changing, seemingly at random, as if to annoy me badly enough to plug my computer in more quickly).
The notification frequency and the notification thresholds can’t be changed, if this isn’t something you want to be reminded about or if it’s something you want to be reminded about even earlier. But you could possibly use the battery level trigger in Shortcuts to customize your Mac’s behavior a bit.
Recovery mode changes
A new automated recovery tool in macOS Tahoe’s recovery volume. Credit: Andrew Cunningham
Tahoe’s version of the macOS Recovery mode gets a new look to match the rest of the OS, but there are a few other things going on, too.
If you’ve ever had a problem getting your Mac to boot, or if you’ve ever just wanted to do a totally fresh install of the operating system, you may have run into the Mac’s built-in recovery environment before. On an Apple Silicon Mac, you can usually access it by pressing and holding the power button when you start up your Mac and clicking the Options button to start up using the hidden recovery volume rather than the main operating system volume.
Tahoe adds a new tool called the Device Recovery Assistant to the recovery environment, accessible from the Utilities menu. This automated tool “will look for any problems” with your system volume “and attempt to resolve them if found.”
Maybe the Recovery Assistant will actually solve your boot problems, and maybe it won’t—it doesn’t tell you much about what it’s doing, beyond needing to unlock FileVault on my system volume to check it out. But it’s one more thing to try if you’re having serious problems with your Mac and you’re not ready to countenance a clean install yet.
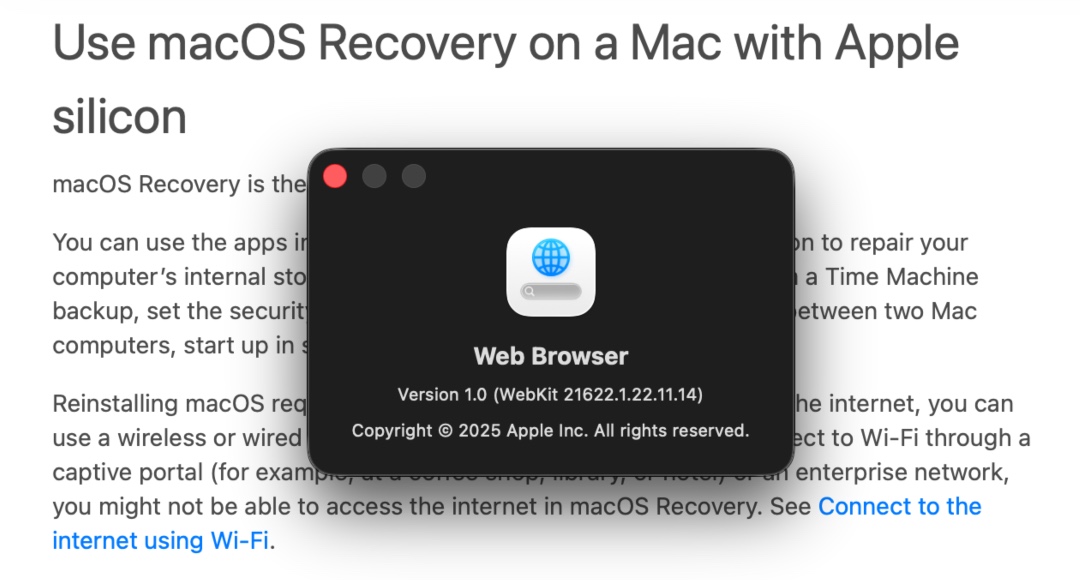
The web browser in the recovery environment is still WebKit, but it’s not Safari-branded anymore, and it sheds a lot of Safari features you wouldn’t want or need in a temporary OS. Credit: Andrew Cunningham
Apple has made a couple of other tweaks to the recovery environment, beyond adding a Liquid Glass aesthetic. The recovery environment’s built-in web browser is simply called Web Browser, and while it’s still based on the same WebKit engine as Safari, it doesn’t have Safari’s branding or its settings (or other features that are extraneous to a temporary recovery environment, like a bookmarks menu). The Terminal window picks up the new Clear theme, new SF Mono Terminal typeface, and the new default 120-row-by-30-column size.
A new disk image format
Not all Mac users interact with disk images regularly, aside from opening them up periodically to install an app or restore an old backup. But among other things, disk images are used by Apple’s Virtualization framework, which makes it relatively simple to run macOS and Linux virtual machines on the platform for testing and other things. But the RAW disk image format used by older macOS versions can come with quite severe performance penalties, even with today’s powerful chips and fast PCI Express-connected SSDs.
Enter the Apple Sparse Image Format, or ASIF. Apple’s developer documentation says that because ASIF images’ “intrinsic structure doesn’t depend on the host file system’s capabilities,” they “transfer more efficiently between hosts or disks.” The upshot is that reading files from and writing files to these images should be a bit closer to your SSD’s native performance (Howard Oakley at The Eclectic Light Company has some testing that suggests significant performance improvements in many cases, though it’s hard to make one-to-one comparisons because testing of the older image formats was done on older hardware).
The upshot is that disk images should be capable of better performance in Tahoe, which will especially benefit virtual machines that rely on disk images. This could benefit the lightweight virtualization apps like VirtualBuddy and Viable that mostly exist to provide a front end for the Virtualization framework, as well as virtualization apps like Parallels that offer support for Windows.
Quantum-safe encryption support
You don’t have a quantum computer on your desk. No one does, outside of labs where this kind of technology is being tested. But when or if they become more widely used, they’ll render many industry-standard forms of encryption relatively easy to break.
AppleCare One can also be extended to other Apple products you own “that are up to four years old” (or one year old for headphones) and “in good condition,” even if they’re outside of the typical 60-day grace period for subscribing to AppleCare+. Apple says that the condition of these devices may need to be verified “using a customer’s iPhone or iPad, or at an Apple Store” before they can be added to the plan, presumably to reduce the number of people who opt in after the fact to avoid pricey repairs to already damaged devices.
While the potential savings are the best argument in favor of the new plan, it also adds a handful of new benefits for some devices. For example, AppleCare One covers theft for both iPads and Apple Watches, something that isn’t covered for these devices under a standard AppleCare+ subscription. The subscription can also simplify the trade-in process, removing a traded-in device from your AppleCare One plan and replacing it with an upgraded device automatically.
If you haven’t subscribed to AppleCare+ before, it functions both as an extended warranty and an insurance program. If your device breaks suddenly for reasons outside of your control, repairs and replacements are generally free of additional charge; for accidental damage, theft and loss, or battery replacements, users are charged additional flat service fees for repairs and replacements, rather than Apple’s hefty parts and labor costs. Battery replacements are also free when your battery drops below 80 percent of its original capacity.
AppleCare One plans will go on sale starting tomorrow, July 24.
Not a surprising generational update, but a lot of progress for just one year.
The new M4 Pro and M4 Max MacBook Pros. Credit: Andrew Cunningham
The new M4 Pro and M4 Max MacBook Pros. Credit: Andrew Cunningham
In some ways, my review of the new MacBook Pros will be a lot like my review of the new iMac. This is the third year and fourth generation of the Apple Silicon-era MacBook Pro design, and outwardly, few things have changed about the new M4, M4 Pro, and M4 Max laptops.
Here are the things that are different. Boosted RAM capacities, across the entire lineup but most crucially in the entry-level $1,599 M4 MacBook Pro, make the new laptops a shade cheaper and more versatile than they used to be. The new nano-texture display option, a $150 upgrade on all models, is a lovely matte-textured coating that completely eliminates reflections. There’s a third Thunderbolt port on the baseline M4 model (the M3 model had two), and it can drive up to three displays simultaneously (two external, plus the built-in screen). There’s a new webcam. It looks a little nicer and has a wide-angle lens that can show what’s on your desk instead of your face if you want it to. And there are new chips, which we’ll get to.
That is essentially the end of the list. If you are still using an Intel-era MacBook Pro, I’ll point you to our previous reviews, which mostly celebrate the improvements (more and different kids of ports, larger screens) while picking one or two nits (they are a bit larger and heavier than late-Intel MacBook Pros, and the display notch is an eyesore).
New chips: M4 and M4 Pro
That leaves us with the M4, M4 Pro, and M4 Max.
We’ve already talked a bunch about the M4 and M4 Pro in our reviews of the new iMac and the new Mac minis, but to recap, the M4 is a solid generational upgrade over the M3, thanks to its two extra efficiency cores on the CPU side. Comparatively, the M4 Pro is a much larger leap over the M3 Pro, mostly because the M3 Pro was such a mild update compared to the M2 Pro.
The M4’s single-core performance is between 14 and 21 percent faster than the M3s in our tests, and tests that use all the CPU cores are usually 20 or 30 percent faster. The GPU is occasionally as much as 33 percent faster than the M3 in our tests, though more often, the improvements are in the single or low double digits.
For the M4 Pro—bearing in mind that we tested the fully enabled version with 14 CPU cores and 20 GPU cores, and not the slightly cut down version sold in less expensive machines—single-core CPU performance is up by around 20-ish percent in our tests, in line with the regular M4’s performance advantage over the regular M3. The huge boost to CPU core count increases multicore performance by between 50 and 60 percent most of the time, a substantial boost that actually allows the M4 Pro to approach the CPU performance of the 2022 M1 Ultra. GPU performance is up by around 33 percent compared to M3 Pro, thanks to the additional GPU cores and memory bandwidth, but it’s still not as fast as any of Apple’s Max or Ultra chips, even the M1-series.
M4 Max
And finally, there’s the M4 Max (again, the fully enabled version, this one with 12 P-cores, 4 E-cores, 40 GPU cores, and 546GB/s of memory bandwidth). Single-core CPU performance is the biggest leap forward, jumping by between 18 and 28 percent in single-threaded benchmarks. Multi-core performance is generally up by between 15 and 20 percent. That’s a more-than-respectable generational leap, but it’s nowhere near what happened for the M4 Pro since both M3 Mac and M4 Max have the same CPU core counts.
The only weird thing we noticed in our testing was an inconsistent performance in our Handbrake video encoding test. Every time we ran it, it reliably took either five minutes and 20 seconds or four minutes and 30 seconds. For the slower result, power usage was also slightly reduced, which suggests to me that some kind of throttling is happening during this workload; we saw roughly these two results over and over across a dozen or so runs, each separated by at least five minutes to allow the Mac to cool back down. High Power mode didn’t make a difference in either direction.
CPU P/E-cores
GPU cores
RAM options
Display support (including internal)
Memory bandwidth
Apple M4 Max (low)
10/4
32
36GB
Up to five
410GB/s
Apple M4 Max (high)
12/4
40
48/64/128GB
Up to five
546GB/s
Apple M3 Max (high)
12/4
40
48/64/128GB
Up to five
409.6GB/s
Apple M2 Max (high)
8/4
38
64/96GB
Up to five
409.6GB/s
We shared our data with Apple and haven’t received a response. Note that we tested the M4 Max in the 16-inch MacBook Pro, and we’d expect any kind of throttling behavior to be slightly more noticeable in the 14-inch Pro since it has less room for cooling hardware.
The faster result is more in line with the rest of our multi-core tests for the M4 Max. Even the slower of the two results is faster than the M3 Max, albeit not by much. We also didn’t notice similar behavior for any of the other multi-core tests we ran. It’s worth keeping in mind if you plan to use the MacBook Pro for CPU-heavy, sustained workloads that will run for more than a few minutes at a time.
GPU performance in our tests varies widely compared to the M4 Max, with results ranging from as little as 10 or 15 percent (for 4K and 1440p GFXBench tests—the bigger boost to the 1080p version is coming partially from CPU improvements) to as high as 30 percent for the Cinebench 2024 GPU test. I suspect the benefits will vary depending on how much the apps you’re running benefit from the M4 Max’s improved memory bandwidth.
Power efficiency in the M4 Max isn’t dramatically different from the M3 Max—it’s more efficient by virtue of using roughly the same amount of power as the M3 Max and running a little faster, consuming less energy overall to do the same amount of work.
Credit: Andrew Cunningham
Finally, in a test of High Power mode, we did see some very small differences in the GFXBench scores, though not in other GPU-based tests like Cinebench and Blender or in any CPU-based tests. You might notice slightly better performance in games if you’re running them, but as with the M4 Pro, it doesn’t seem hugely beneficial. This is different from how it’s handled in many Windows PCs, including Snapdragon X Elite PCs with Arm-based chips in them because they do have substantially different performance in high-performance mode relative to the default “balanced” mode.
Nice to see you, yearly upgrade
The 14-inch and 16-inch MacBook Pros. The nano-texture glass displays eliminate all of the normal glossy-screen reflections and glare. Credit: Andrew Cunningham
The new MacBook Pros are all solid year-over-year upgrades, though they’ll be most interesting to people who bought their last MacBook Pro toward the end of the Intel era sometime in 2019 or 2020. The nano-texture display, extra speed, and extra RAM may be worth a look for owners of the M1 MacBook Pros if you truly need the best performance you can get in a laptop. But I’d still draw a pretty bright line between latter-day Intel Macs (aging, hot, getting toward the end of the line for macOS updates, not getting all the features of current macOS versions anyway) and any kind of Apple Silicon Mac (fully supported with all features, still-current designs, barely three years old at most).
Frankly, the computer that benefits the most is probably the $1,599 entry-level MacBook Pro, which, thanks to the 16GB RAM upgrade and improved multi-monitor support, is a fairly capable professional computer. Of all the places where Apple’s previous 8GB RAM floor felt inappropriate, it was in the M3 MacBook Pro. With the extra ports, high-refresh-rate screen, and nano-texture coating option, it’s a bit easier to articulate the kind of user who that laptop is actually for, separating it a bit from the 15-inch MacBook Air.
The M4 Pro version also deserves a shout-out for its particularly big performance jump compared to the M2 Pro and M3 Pro generations. It’s a little odd to have a MacBook Pro generation where the middle chip is the most impressive of the three, and that’s not to discount how fast the M4 Max is—it’s just the reality of the situation given Apple’s focus on efficiency rather than performance for the M3 Pro.
The good
RAM upgrades across the whole lineup. This particularly benefits the $1,599 M4 MacBook Air, which jumps from 8GB to 16GB
M4 and M4 Max are both respectable generational upgrades and offer substantial performance boosts from Intel or even M1 Macs
M4 Pro is a huge generational leap, as Apple’s M3 Pro used a more conservative design
Nano-texture display coating is very nice and not too expensive relative to the price of the laptops
Better multi-monitor support for M4 version
Other design things—ports, 120 Hz screen, keyboard, and trackpad—are all mostly the same as before and are all very nice
The bad
Occasional evidence of M4 Max performance throttling, though it’s inconsistent, and we only saw it in one of our benchmarks
Need to jump all the way to M4 Max to get the best GPU performance
The ugly
Expensive, especially once you start considering RAM and storage upgrades
Andrew is a Senior Technology Reporter at Ars Technica, with a focus on consumer tech including computer hardware and in-depth reviews of operating systems like Windows and macOS. Andrew lives in Philadelphia and co-hosts a weekly book podcast called Overdue.
The M4 Max is also the only chip where memory bandwidth and RAM support changes between the low- and high-end versions. The low-end M4 Max offers 410GB/s of memory bandwidth, while the fully enabled M4 Max offers 546GB/s.
For completeness’ sake, there is a third version of the M4 that Apple ships, with nine CPU cores, 10 GPU cores, and 8GB of RAM. But the company is only shipping that version of the chip in M4 iPad Pros with 256GB or 512GB of storage, so we haven’t included it in the tables here.
Compared to the M2 and M3
CPU P/E-cores
GPU cores
RAM options
Display support (including internal)
Memory bandwidth
Apple M4 (low)
4/4
8
16/24GB
Up to two
120GB/s
Apple M4 (high)
4/6
10
16/24/32GB
Up to three
120GB/s
Apple M3 (high)
4/4
16
8/16/24GB
Up to two
102.4GB/s
Apple M2 (high)
4/4
10
8/16/24GB
Up to two
102.4GB/s
One interesting thing about the M4: This is the first time that the low-end Apple Silicon CPU has increased its maximum core count. The M1, M2, and M3 all used a 4+4 split that divided evenly between performance and efficiency cores, but the M4 can include six efficiency cores instead.
That’s not a game-changing development performance-wise (the “E” in “E-core” does not stand for “exciting”), but we’ve seen over and over again in chips from Apple, Intel, and others that adding more efficiency cores does meaningfully improve CPU performance in heavily multithreaded tasks.
CPU P/E-cores
GPU cores
RAM options
Display support (including internal)
Memory bandwidth
Apple M4 Pro (low)
8/4
16
24/48/64GB
Up to three
273GB/s
Apple M4 Pro (high)
10/4
20
24/48/64GB
Up to three
273GB/s
Apple M3 Pro (high)
6/6
18
18/36GB
Up to three
153.6GB/s
Apple M2 Pro (high)
8/4
19
16/32GB
Up to three
204.8GB/s
The M4 Pro is the most interesting year-over-year upgrade, though this says more about the M3 Pro than anything else. As we noted last year, it was a bit of an outlier, the only one of the M3-generation chips with fewer transistors than its predecessor. A small decrease in GPU cores and a large decrease in high-performance CPU cores explains most of the difference. The result was a very power-efficient chip, but also one that was more of a sidestep from the M2 Pro than a real upgrade.
Reliable rumors have suggested that M4 Macs are right around the corner, and now Bloomberg’s Mark Gurman is forecasting a specific launch date: November 1, following a late-October announcement that mirrors last year’s Halloween-themed reveal for the first M3 Macs.
This date could be subject to change, and not all the products announced in October would necessarily launch on November 1—lower-end Macs are more likely to launch early, and higher-end models would be more likely to ship a bit later in the month.
The list of what to expect is the same as it has been for a while: refreshed 14- and 16-inch MacBook Pros with M4, M4 Pro, and M4 Max chips, a new M4 version of the 24-inch iMac, and an M4 update to the Mac mini that leapfrogs the M3 entirely. These will all be the first Macs to get the M4, following its unexpected introduction in the iPad Pro earlier this year.
The refreshed Mac mini is the most interesting of the new models—it’s said to come with a fully revamped design for the first time since the aluminum unibody version was released in 2010. The new Mac mini is said to be closer in size to an Apple TV box, but it will retain an internal power supply that doesn’t require a bulky external brick. The Mac mini lineup should still be split between two slightly different machines: one entry-level model with a basic M4 chip, and a higher-end M4 Pro version that bridges the gap between the Mac mini and the Mac Studio.
The macOS 15 Sequoia update will inevitably be known as “the AI one” in retrospect, introducing, as it does, the first wave of “Apple Intelligence” features.
That’s funny because none of that stuff is actually ready for the 15.0 release that’s coming out today. A lot of it is coming “later this fall” in the 15.1 update, which Apple has been testing entirely separately from the 15.0 betas for weeks now. Some of it won’t be ready until after that—rumors say image generation won’t be ready until the end of the year—but in any case, none of it is ready for public consumption yet.
But the AI-free 15.0 release does give us a chance to evaluate all of the non-AI additions to macOS this year. Apple Intelligence is sucking up a lot of the media oxygen, but in most other ways, this is a typical 2020s-era macOS release, with one or two headliners, several quality-of-life tweaks, and some sparsely documented under-the-hood stuff that will subtly change how you experience the operating system.
The AI-free version of the operating system is also the one that all users of the remaining Intel Macs will be using, since all of the Apple Intelligence features require Apple Silicon. Most of the Intel Macs that ran last year’s Sonoma release will run Sequoia this year—the first time this has happened since 2019—but the difference between the same macOS version running on different CPUs will be wider than it has been. It’s a clear indicator that the Intel Mac era is drawing to a close, even if support hasn’t totally ended just yet.
Enlarge/ Apple bragged about the thinness of the M4 iPad Pro; it’s apparently a template for the company’s designs going forward.
Apple
Though Apple has a reputation for prioritizing thinness in its hardware designs, the company has actually spent the last few years learning to embrace a little extra size and/or weight in its hardware. The Apple Silicon MacBook Pro designs are both thicker and heavier than the Intel-era MacBook Pros they replaced. The MacBook Air gave up its distinctive taper. Even the iPhone 15 Pro was a shade thicker than its predecessor.
But Apple is apparently planning to return to emphasizing thinness in its devices, according to reporting from Bloomberg’s Mark Gurman (in a piece that is otherwise mostly about Apple’s phased rollout of the AI-powered features it announced at its Worldwide Developers Conference last week).
Gurman’s sources say that Apple is planning “a significantly skinnier iPhone in time for the iPhone 17 line in 2025,” which presumably means that we can expect the iPhone 16 to continue in the same vein as current iPhone 15 models. The Apple Watch and MacBook Pro are also apparently on the list of devices Apple is trying to make thinner.
Apple previewed this strategy with the introduction of the M4 iPad Pro a couple of months ago, which looked a lot like the previous-generation iPad Pro design but was a few hundredths of an inch thinner and (especially for the 13-inch model) noticeably lighter than before. Gurman says the new iPad Pro is “the beginning of a new class of Apple devices that should be the thinnest and lightest products in their categories across the whole tech industry.”
Thin-first design isn’t an inherently good or bad thing, but the issue in Apple’s case is that it has occasionally come at the expense of other more desirable features. A thinner device has less room for cooling hardware like fans and heatsinks, less room for batteries, and less room to fit ports.
The late-2010s-era MacBook Pro and Air redesigns were probably the nadir of this thin-first design, switching to all-Thunderbolt ports and a stiff-feeling butterfly switch keyboard design that also ended up being so breakage-prone that it spawned a long-running Apple repair program and a class-action lawsuit that the company settled. The 2020 and 2021 MacBooks reversed course on both decisions, reverting to a more traditional scissor-switch keyboard and restoring larger ports like MagSafe and HDMI.
Hopefully, Apple has learned the lessons of the last decade or so and is planning not to give up features people like just so it can craft thinner hardware. The new iPad Pros are a reason for optimism—they don’t really give up anything relative to older iPad models while still improving performance and screen quality. But iPad hardware is inherently more minimalist than the Mac and is less space-constrained than an iPhone or an Apple Watch. Here’s hoping Apple has figured out how to make a thinner, lighter Mac without giving up ports or keyboard quality or a thinner, lighter iPhone or Apple Watch without hurting battery life.


